This article may contain compensated links. Learn more in our disclaimer.
Just google the best hikes in Norway…
And you’ll find the Trolltunga Hike. While Norway is a big country, and there are plenty of outdoorsy things to do in Norway, hiking to Trolltunga lately has become one of the most popular activities that everyone wants to do. It’s easy to understand why. The hike is easily accessible. You don’t need any special skills or equipment to do it. During the summer it’s also very easy to follow the trail.
And the views… the views are out of this world spectacular.
We did the hike during a long weekend trip from Riga to Oslo.
Let’s talk about how you can do the same!
Plus – how to see some epic waterfalls near Trolltunga.
Table of Contents
Hiking in Norway: Trolltunga Hike
1. Trolltunga Hike: Basics

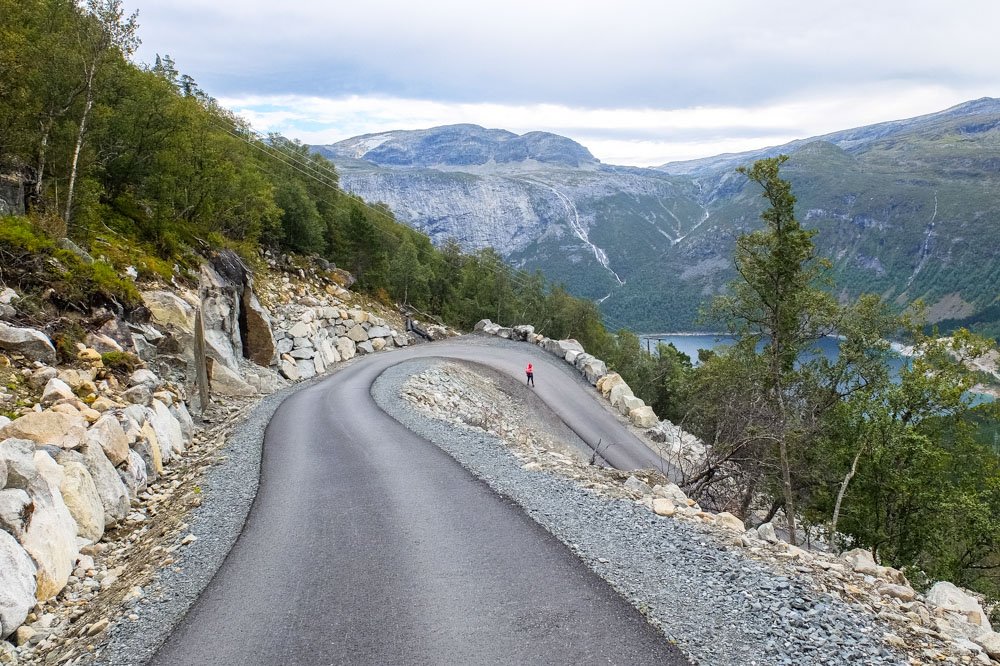
On the left is the famous Trolltunga cliff.
Mostly you see it from another angle, but I want to show you its surroundings.
STARTING POINT: Trolltunga lower parking lot.
If you plan to hike the whole trail, this is where you’ll start walking.
Would you decide to make the total distance shorter, it is possible to take a shuttle bus from here and skip the steepest ascent. If you walk, it will take you about an hour (2.8 miles / 4.5 km).
TROLLTUNGA HIKE TIME: around 10 hours in total;
TOTAL DISTANCE: around 17 miles / 27 km.
DIFFICULTY: moderate/challenging;
TIPS: go early and be prepared for harsh weather.
It’s a rather long hike and the weather in Norway is unpredictable. If it rains, it can be very cold even during the summer. The best season for hiking is summer.
There is something very special about nature of Norway. It’s raw and wild.
2. How to Get to Trolltunga?
We went to Trolltunga from Oslo. It’s not the best option.
Flying to Bergen is a much better choice.
It’s at least two or three times cheaper, and it takes less time. That’s one of the best things about traveling in Europe, there are cheap flights to a lot of places, not only the most popular destinations.
2.1 If You’ll Be Coming By Public Transportation
This is how you should plan your arrival.
1. First you need to get to Odda.
2. Then from Odda to Trolltunga parking (Skjeggedal).
There is a shuttle bus from Odda to Trolltunga parking – Taxi/Bus Odda.
It’s the cheapest way to get there. You can pay with bank card to driver.
There is a long tunnel on the way, so I wouldn’t recommend walking.
3. And then from Trolltunga parking (Skjeggedal) to Magelitopp. If you’re skipping the tarmac part of the trail).
Here is Skjeggedal to Magelitopp timetable:

Other thing to keep in mind – don’t plan it as a day trip.
If you are traveling using public transportation, you’ll have to stay somewhere near Trolltunga at least for 1 night.
2.2 Oslo to Trolltunga (to Odda)
There are 2-3 buses a day from Oslo to Odda.
If you are short on time, it’s a good idea to take the latest bus, which leaves Oslo at around 11 pm and arrives in Odda early in the morning.
Oslo – Odda bus journey takes around 6-7 hours.
You have to change bus at one point, but it’s very easy. They stop next to each other and everyone goes to the other bus.
One-way ticket costs 585 NOK.
Buy your bus ticket online www.nor-way.no/en/.
As already mentioned, if you can better don’t go to Trolltunga from Oslo. Go from Bergen instead. It’s cheaper, easier and faster.
2.3 Bergen to Trolltunga (to Odda)
There are several buses a day from Bergen to Odda bus station
Bus journey takes around 2-3 hours, and costs around 200 – 400 NOK.
Buy your bus ticket online – www.skyss.no/en/ – or in app Skyss billet.
3. Trolltunga Hike: Our Experience

We did walk up the road to Magelitopp.
We had just spent a night in a bus, and then an hour at the bus station, and some more time on the shuttle bus. We just wanted to start walking finally. And to stop paying as well. Everything is costly in Norway.
Prices start from around 10 bucks. For anything.
Do you wanna go to toilet? 3 dollars. A coffee and a bun? 12 dollars.
Right from the beginning there are quite a lot of others hikers.

And the nature is very beautiful as well.
Right from the beginning.

At first there is the above mentioned tarmac road.
1 hour on the road, and you end up in more or less flat area.
After some 30 minutes of walking starts next hardest part of the trail.
A rather steep ascent. In the photo above is the final part of this ascent.

After that walking becomes easier.

And it is possible to wander off the trail almost anywhere.
For example, to sit down and have a lunch (what you have packed with you).
Lunch with a view like this.

During the season (June – September) it’s easy to follow the trail.
If not for anything else, then for the other people.
There are a lot of other people hiking Trolltunga trail.
However, having spent more than 4 years in Asia I felt totally comfortable. It didn’t feel like there are too many people to me.

The views! Wow, just wow.
A beautiful place for a walk, isn’t it?

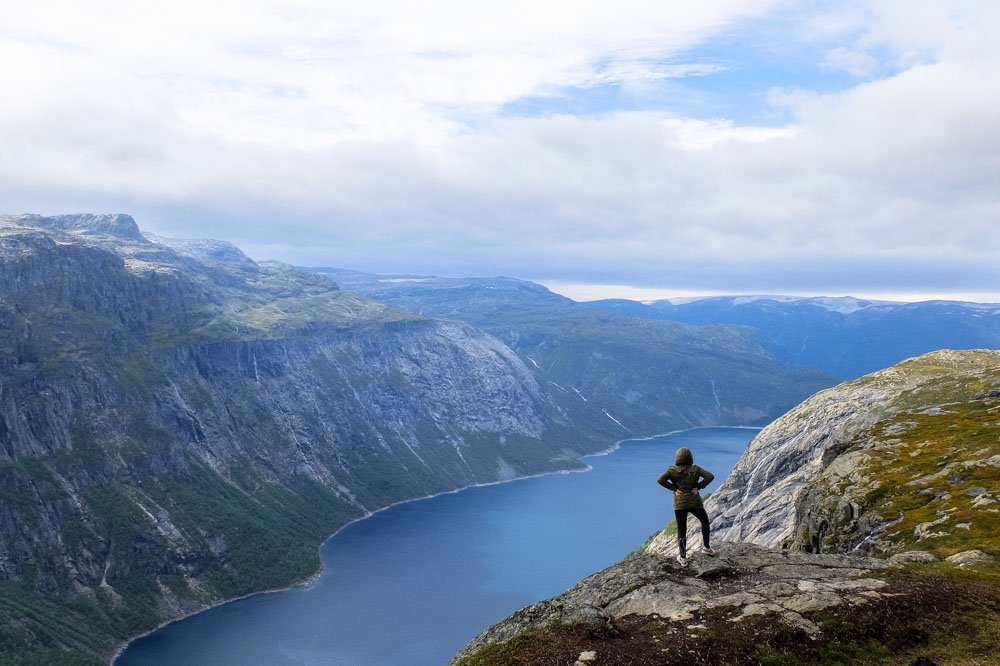
We walked all the way until the famous Trolltunga cliff.
As expected, there were some 50+ people waiting in a line to get “that photo”.
We weren’t interested in it. Especially after seeing how beautiful the surroundings were.
We didn’t want to spend that hour in the line.
Instead we took some photos from different angles, and sat down for lunch/dinner. After about an hour we turned around and walked all the way back to Trolltunga parking lot, taking the same trail.
Even though it was sunny for most of the day, it was cold at times.
Mostly because of the strong wind.
It was in September 2019.
4. How to Avoid Crowds (Partly)?

This is an option I have only heard about, but haven’t tried myself.
Some people on the internet say, that it’s possible skip the first part. Walk along the lake at first. And start ascending after some 3 miles / 5 kilometers. Shortly afterwards there is a via ferrata you can use to get to Trolltunga (if you have the right equipment and experience).
This way you would avoid the biggest crowd of other hikers. For a while.
5. Latefossen Waterfall is BEAUTIFUL

And it’s pretty close to Odda.
Only some 20 minutes of driving, and you are there.
The waterfall is right next to the road. You simply can’t miss it. It’s huge.
If you have time, definitely visit it.
Taxi from Odda costs around 500 NOK.
You can also walk there. It’s rather dangerous, because the road is narrow and you are walking on the road. But if you are careful, it’s doable. We did so. There is only one tunnel on the way, and you can walk around it. There is an old road going around.
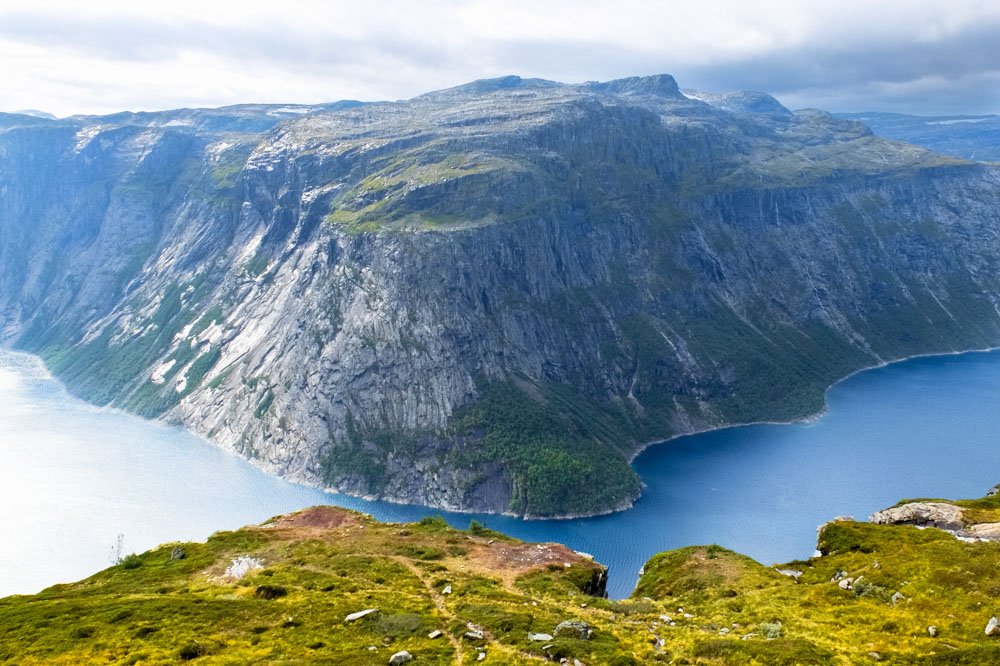
On the left side of the waterfall, you can get a bit higher.
Here is how it looks from up there.

Just across the road from it is another beautiful waterfall.
As you can see in the photo above (look to the left).
From Låtefossen waterfall we walked to Seljestad, from where we had a bus to Oslo in the afternoon. Seljestad bus station is tiny. It’s easy to miss it. So, make sure to follow Google Maps or your navigation carefully. You may miss the station otherwise.
6. Trolltunga Guided Tour
There are many tour companies offering guided tours.
Some will simply take you to Trolltunga, while others offer also camping near Trolltunga and via ferrata experience.
Here is one cool adventurous Trolltunga tour I’ve found.
7. Where to Stay Near Trolltunga?
We stayed in a village called Tyssedal.
We found this room via Airbnb. It’s a nice room I can recommend. While we enjoyed our room, I wouldn’t recommend you to stay in Tyssedal. There is absolutely nothing to do. And if you will want to go to Odda, when there is no buses going, you’ll have to take taxi for around 200 NOK.
Better stay in Odda.
There are very few options to choose from.
Here is one of the best options for the price – Hardanger Hotel.
Have you done Trolltunga Hike? What was your experience?
Book Your Trip Like a PRO
1. Book Your Flight. Find cheap flights using Kiwi.com, Momondo.com. Or subscribe to Dollar Flight Club, if you don’t want to be searching for the flights yourself. Kiwi currently is my first choice.
2. Book Your Accommodation. Booking.com, Agoda.com and Airbnb. I use Booking and Agoda at least a dozen times a year, and Airbnb – when looking for a long-term stay. My best tip is to ALWAYS compare the price. Sometimes the same hotel is cheaper on Booking.com, other times – on Agoda. Always compare the price!
3. Buy Your Travel Insurance. Ekta and SafetyWings are two companies I can recommend. Ekta offers some extra benefits, that will be important for those doing some higher risk activities (make sure to choose the right plan!), while SafetyWings is better for digital nomads. SafetyWings is also very affordable.
Disclaimer for Amazon Associates: MakeAdventureHappen.com is a participant in the Amazon Services LLC Associates Program, an affiliate advertising program designed to provide a means for sites to earn advertising fees by advertising and linking to amazon.com. Amazon and the Amazon logo are trademarks of Amazon.com, Inc. or its affiliates. As an Amazon Associate I earn from qualifying purchases.